Modern Etudes

I’m thrilled to announce the release of my Modern Etudes book on May 6!

Over the past few years, I’m released a bunch of short 60 sec original improvisations/productions (mainly on Instagram & YouTube) aimed at modern approaches to harmony & improvisation. These were originally just fun projects for me to work on in my spare time but I’ve had a bunch of requests for transcriptions, so I figured I’d compile 12 of the most popular ones, and put them in sheet-music form.

I’m passionate about modernizing how we learn, so this resource isn’t limited to just sheet music (although everything will be written out). I’ll also be including the MIDI for each etude, fully produced backing tracks at 3 speeds, & extensive video lessons for each one breaking down the theory & technique. That means you’ll be able to learn & follow along whether you read music or you don’t.

Interested? Sign up for updates here.

Have thoughts on what I should include? Shoot me a message here.

-David

The Benefits of Transcribing: Physical, Vertical, Horizontal

David Rodgers plays the transcription of "The Champ" originally played by Joey DeFrancesco

Transcribing for jazz musicians is, at its most fundamental level, how we learn. Sure, we’ve all heard that it’s good for you, but why do it? I didn’t used to be a fan. I thought it was a boring waste of time and a redundant aural exercise. As I’ve learned, there are so many more dimensions of benefits that go way past the surface level physical benefits. I’m going to touch on just a few today.


But first, my preferred method when transcribing:

1)    LISTEN to the passage you’re transcribing all the way through a few times. Try to get a grasp on the structure. What’s the form? What’s going on underneath all those lines?!

2)    Start SLOW. Be intent on every note you’re listening for, as if you’re the one playing! You’ll likely recognize something in the passage you’re trying to transcribe. Remember what it is. (Slow it down if you must…free programs like Audacity have the capabilities to slow it down for you without altering pitch).

3)    Start from the BEGINNING. I find that it’s easiest to have an instrument nearby when transcribing to be able to play it as I go. This doesn’t change if I decide to write it down or not. Sometimes, however, I prefer to transcribe away from any instrument entirely. This focuses more on my aural and conceptual intellectual skills.

4)    Look for PATTERNS. There’s likely some sort of pattern (or patterns) that are holding this whole thing together? What is it? Is it a harmonic progression? Are there sequential passages? Look for anything that repeats itself even in the subtlest way. This will clue you in on what you should be listening for and can put you in the creator’s shoes to an extent.

5)    Be patient and WORK HARD. There’s no getting around this one. If you’re going to successfully transcribe a passage, you need to stick with it. The nice thing about transcribing versus improvising is that there’s only ONE possible answer – the truth. What are the notes Charlie Parker played here? What are the rhythms? There might be different ways of notating these things, but notation isn’t music. There is only ONE correct way of playing it along with Bird. Do you sound like him or do you not?

6)    Finally, as you begin to play through the passage (and especially if it’s improvised), pretend you’re the CREATOR. Defend, to yourself or somebody else, each musical decision. Why did you choose these notes? Approaching the analytical process this way will help give you an insight into why exactly this person did this. Really defend it! Figure out why it works. If you can’t, ask somebody (like a teacher) who might know!


NOW...

...on to the benefits. Once you get past the aural benefit of transcribing (something I think is very important but only the top layer of the value of transcribing), you start to dig into the meat and potatoes of what makes this practice invaluable. I think the most valuable part of transcribing to me is seeing how somebody else took something I know (the blues in this case) and made it uniquely theirs. While I'm transcribing, I'm asking myself, why did he/or she make this decision? Why not this note? Why leave space here?


I think of transcribing in terms of THREE main benefits:

1)    Physical

2)    Vertical Intellectual

3)    Horizontal Intellectual/Architecture


1)    The Physical benefits of transcribing are the most surface level benefits and really require little explanation. When you transcribe a solo, you are basically practicing extended melodic and rhythmic dictation. Thus, you’re improving your aural skills in one of the most efficient ways you can. The other physical benefit is the practice of it. Especially if the solo is more technically demanding, you will have to practice those passages as if you were practicing a classical etude until you can play it up to speed with the recording. Thus, by transcribing a passage, you’re working on your aural technique as well as your instrument-facility technique. No wonder it’s such a recommended practice!

2)    The Vertical Intellectual benefit, as I like to call it, is part of the analytical process. Think vertically (as we often do when we improvise) and think in terms of a single harmony or a few harmonic changes (such as a 2-5-1 progression). Ask yourself why. Why did he make these musical decisions in relation to the vertical component of this improvised passage? Why does this Gb work against this Cm9 chord? (Oh, it’s a chromatic passing tone). Part of this analytical process will help you get an understanding of what you like as well. I’m a big believer of developing intention when we improvise. Thus, figuring out what you like and what you don’t like is one of the most fundamental ways of developing intent. (If you don’t like the sound of what you’re playing, why should anybody else?!)

3)    The Horizontal Intellectual/Architecture benefit or the THIRD DIMENSION of transcribing is what I consider to be the most valuable part of transcribing and something that can only come at the end of the analytical process. What makes the whole solo or tune work? Why is this transcription considered great? Try to analyze and understand the transcription from a horizontal/linear approach. What about the architecture makes this work? (HINT: It has a lot to do with the balance of tension and release). This is also the step where you can get a sense for the creator’s personal style/genius/whatever you want to call it. So often, I think improvisers struggle with the idea of form. I certainly do and am constantly working towards a better understanding of what “form” really means. This last stage in the process of transcribing is really the stage where you can get the best sense of why this solo is considered to be “great” or “genius.” In a nutshell: it works. Why?


I hope these are helpful. This has been an approach that has worked the best for me – both from a physical skills level and also an intellectual level. Does any of this sound familiar to you? What’s worked best for you? I’m curious. Let me know what you think! -DMR


Improving Brain & Finger Technique & Independence (For Pianists)

A pianist’s left hand. So often, it can be the Achilles Heel of pianistic technique. And while classical pianists often have a much stronger left hand than jazz pianists by comparison (as a gross generalization), ask any pianist and they’ll most likely tell you that they wish their left hand was “stronger.” But what exactly does that mean?

Technique or “strength” in a hand really comes down to just two things: 1) Rhythmic clarity AND 2) Rhythmic independence (in the fingers)

Why the stress on rhythm? Don’t worry, it’s not all about playing lots of fast notes. Because the piano is a percussion instrument, the tone of the instrument is dependent on how we both attack and release the key. In other words: speed into the key and speed out of the key. Think of rhythm as having both vertical and horizontal components. So often, when we think technique, we focus on the horizontal component of rhythm: moving from one note to the next. But there’s so much more: how we enter the key, how we release it, how we prepare all of that, etc. But it all comes back to rhythm.


FIRST, try this:

How many different tones/colors can you get on one note with your left hand pinky? 4th finger? 3rd? 2nd? Thumb? Shoot for at least 15 per finger!


I find Hannon exercises boring. I find actual music stimulating. So, I figured, why not use real music as a vehicle for improving the technique of my left hand (specifically). Though I am originally classically trained and have played a fair bit of the standard classical repertoire, I’m always looking to get better at every aspect of my musicianship. Technique is so important to me because of what it can lead to, not what it represents in isolation. Fast notes mean nothing unless there is intent behind them. Think of improving your pianistic technique like a great speaker would improving on diction, vocabulary, or grammar. These things mean very little until that speaker decides what he’s going to say. But if he didn’t have those tools, he’d be limiting himself.

I had a chance to work with Felix Pastorious a few years back, and to this day, I think his definition of technique is the best I’ve heard: “Technique is what you need to do to consistently produce the sound you want without hurting yourself.” Think about that…


Here are FOUR creative approaches I’ve taken to drastically improving my left hand in under a year:


1)    Practice solo lines in unison

There was a point in my playing about a year ago where my left hand sounded so bad whenever I’d try to improvise a line with it, that I almost entirely gave up on left hand improvisation. Luckily, there was a solution. As a starting point, try playing a solo line (could be a passage in a Bach Prelude or Fugue, a Chopin Etude, or a transcription of Coltrane or Bird) with both hands at the same time, an octave or 2 octaves apart. I practiced countless Charlie Parker Omnibook transcriptions this way. There were 2 big benefits to that approach. 1) Because Bird was a saxophonist, his lines didn’t inherently favor the R.H. As a result, both hands started from the same neutral point since the creation of the lines hadn’t considered what was “pianistic” or not. 2) Doing it this way really illuminated just how much more quickly my right hand solved the problem of fingering on the spot than my left hand. (I say “right hand or left hand” but of course, it’s really my brain making these decisions. To get really technical, quite simply, the neuropathways forged in my brain were much, much stronger for solving the issue of R.H. fingering on the fly just because I did it more!)

Practicing just the left hand on its own is effective, but practicing hands together is advantageous because you will most likely have a guide in your R.H. You’re constantly aware of what the standard is and won’t get frustrated as quickly.


2)    Practice Playing melodies in your left hand

It’s easy to “hear” with your right hand if you’re not accustomed to (even sometimes) prioritizing your listening to the L.H. Practice playing melodies in your left hand to develop your ear and in a sense, recalibrate how you listen. Melodies can be taken from a Chopin nocturne, a jazz standard, or a top-40 hit…or anything else! Be creative with how you practice. If you’re not at least somewhat enjoying yourself, the practice session won’t be as sustainable or as enticing to come back to.

When playing melodies in your left hand, focus on rhythmic clarity and a lyrical tone. How would it sound if you sang it? The more and more you do this, the more lyrical independence you’ll develop in your L.H. giving you a wider palette of colors to choose from whenever you play. If you find that you’re having trouble with this, play the melody in your R.H. a few times or even sing it. Listen to a recording of that melody and think of all the different ways that you can emulate the subtleties of tone, time, articulation, etc. with your L.H. Focus on the details! Pretty soon, they’ll be automatic.

As a bonus, try improvising in your L.H. This might be a technique best suited for jazz pianists or people who are comfortable improvising in general. Make sure you have a metronome on to give yourself an honest sense of the pulse. (All 4 beats are fine, 2 & 4 is better, randomly occurring is best! :-) This is something I’ll cover in a separate article about how I use the metronome). For example, take a jazz standard like “Autumn Leaves” and improvise with just your L.H. Most likely, you’ll find that you’re hearing things that you’re unable to play cleanly. Slow it down until what you hear matches up with what you can play. Then slowly increase the tempo. As that becomes more and more comfortable, try comping with your RIGHT HAND. You may have to slow down the metronome again… :-)


3)    Practice scales hands together with a metronome, BUT…

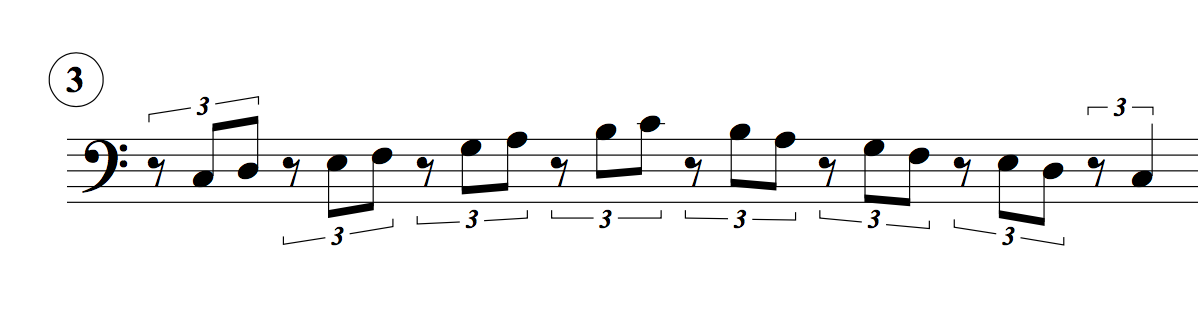
Focus on the rhythmic clarity and tone first and foremost. It’s easy to play linear rhythms (that is, a constant stream of eighth notes, triplets, sixteenths, etc.) It’s a LOT harder to control a rhythm like a [dotted 8th – 16th] pattern or a classic “swing” rhythm. See below for a few examples. It’s also a lot harder when you don’t play on strong beats.

The reason this is so effective (and difficult) is that we’re focusing on the subtle fine motor skills in your fingers. In essence, you’re improving your rhythmic reaction time. Your left hand is likely a little less reactive than your right hand. Have you ever been frustrated playing a 3 or 4 octave scale at a fast tempo with your left hand? Yet, when you play just an octave it’s fine. That’s because your L.H. (of course, it’s really the part of the brain controlling the L.H. motor skills) takes more time to react to anything than your R.H. might. By practicing “off the beat” as seen in Examples 3 &4, we’re zeroing in on this issue and addressing it head-on.


4)    The Left Hand Ostinato of Doom! Just Kidding… :-)

This is probably my favorite of these practice techniques. Create an Ostinato in the L.H. (involving all 5 fingers). See Example 5 below: (a 12 note figure playing through the circle of 5ths within 1-octave!) When you’ve digested it enough that it’s comfortable, keep it going while playing a melody on top (again, improvised or not, you choose!) Next try different rhythmic figures in your R.H. while keeping that ostinato going (this is a technique I also use in my specific rhythmic practice). Lastly, try to improvise over the ostinato. As you do all of these things, be consciously aware of EVERYTHING that is happening at once. This, I believe, expands what your brain is capable of independently controlling at one time. That’s why I’m in awe of drummers who are able to maintain 4 limb independence! If they can do 4, we can do 2!

Example fingering for this could be: 5-2-1; 4-2-5; 3-1-4; 2-5-1

Example fingering for this could be: 5-2-1; 4-2-5; 3-1-4; 2-5-1


I hope these are helpful and insightful! I, by no means, have the world’s best L.H. However, I’m sharing what has worked drastically well for me. Take it as you will! There are countless variations on each of these examples as well. I showed examples here of the most basic variations. Use any ideas here and expand on them with your own creative energy! Feel free to contact me and let me know how/if these are working out for you. And as always, let me know what you’re curious about…chances are, I am too! :-) DMR